
How to Take Progress Photos That Show Real Change
Quick answer: Take progress photos every 2 to 4 weeks under identical conditions: same spot, same lighting, same minimal clothing, same time of day (morning, before eating). Shoot four angles (front, side, back, plus one flexed shot) from a fixed camera position, then store them somewhere you can compare them side by side.
You already write down every set. Bench, weight, reps, done. Your log tells you exactly what your lifts are doing.
A workout log says nothing about what your body is doing. That is the gap progress photos fill, and most lifters take them so randomly (different mirror, different light, different pump) that the photos cannot answer the question either. The fix is not effort. It is consistency.
Progress photos vs the scale: which one tells the truth?
The scale measures everything except the thing you care about. Water, glycogen, sodium, and last night's dinner all show up as "weight". In a study that tracked 80 adults across 4,657 daily weigh-ins, body weight reliably peaked on Sunday and Monday and fell through the week. That weekly weight swing has nothing to do with muscle or fat change.
Smart scales that estimate body fat are noisy too. In a 2020 study of bioelectrical impedance analysis, drinking half a liter of water shifted body fat readings by roughly 2 to 3.4 percentage points, and two liters pushed the error to 8 to 9 points. One water bottle can erase a month of real progress on a smart scale's body fat reading.
A consistent photo cannot be fooled as easily. Your silhouette does not care how hydrated you are today. Photos have limits (they cannot see visceral fat, and bad lighting can flatter or punish), but a standardized photo taken the same way each month is the cheapest honest signal of body composition you can get. Treat them as one lane of tracking your gym progress: the log covers performance, the photos cover the physique. Pair both with a calorie target from our free TDEE calculator so you know you are actually eating for the change you want the camera to catch.
How often should you take progress pictures?
Every 2 to 4 weeks is the sweet spot. Daily photos show water and lighting noise, not change. Muscle growth is slow enough that back-to-back weeks look identical, which is exactly how people convince themselves nothing is working.
A 2-to-4 week cadence also lines up neatly with how most people train: roughly one photo session per training block. Pick a fixed slot (say, the first Sunday morning of the month, or every other Friday) and put a repeating reminder on your phone. The date matters less than repeating it.
How do you take progress photos that actually compare?
Consistency beats quality. A blurry photo taken under the same conditions as last month is more useful than a great photo taken under new ones. Standardize four things.
Same spot, same light
Pick one location with lighting you control: a bathroom with one overhead light, or a room with a window at the same time of day. Overhead light exaggerates shadows and abs; soft front light flattens them. Neither is "wrong", but mixing them makes photos incomparable.
Same clothing
Wear the same minimal outfit every time: shorts for men, shorts and a sports bra for women. A different waistband height alone can visually change your midsection.
Same camera position
Do not handhold at arm's length; your arm moves and the wide-angle distortion changes with distance. Lean the phone against a shelf or use a cheap tripod, mark the floor spot, and use the timer. If you prefer mirror shots, fine, but use the same mirror and stand on the same tile every time.
Same time of day
Shoot in the morning, before food and after the bathroom. You are at your flattest and least pumped, which is the honest baseline. An evening photo after a back workout is a highlight reel, not a data point.
What progress picture poses should you use?
You need four shots, and the first three are relaxed. Relaxed poses are the baseline your body actually lives at, and they are the hardest to cheat:
- Front, relaxed. Arms slightly away from your sides, no sucking in, no flexing. Breathe out normally.
- Side, relaxed. Same natural posture. This angle shows midsection change first for most people.
- Back, relaxed. Prop the phone and use the timer, or ask someone. The back changes dramatically and nobody sees it in the mirror.
- One flexed shot. Pick a pose you can repeat, like front double biceps, and keep it identical each session. Flexed shots track muscle shape, but only if the effort level stays consistent.
A copy-paste progress photo checklist
The same trick that works for workout notes works here: write the protocol down once so you never re-decide it. Paste this into your notes app next to your training log and duplicate it each session:
PROGRESS PHOTOS: [date]

Time: 7am, fasted
Spot: bathroom, overhead light, feet on marked tile
Wear: black shorts
Camera: leaning on shelf, timer 3s
Shots: front / side / back / flex
Weight this morning:
Notes (sleep, carbs, anything unusual):
Fill in your own specifics once. From then on, a photo session is five minutes of following your own instructions instead of guessing what you did last month.
Which apps make progress photos easier?
Your camera app and a dedicated album are enough to start, and starting matters more than tooling. But a dedicated app solves the two genuinely hard parts: keeping every shot framed identically, and comparing photos that are months apart. Four are worth knowing.
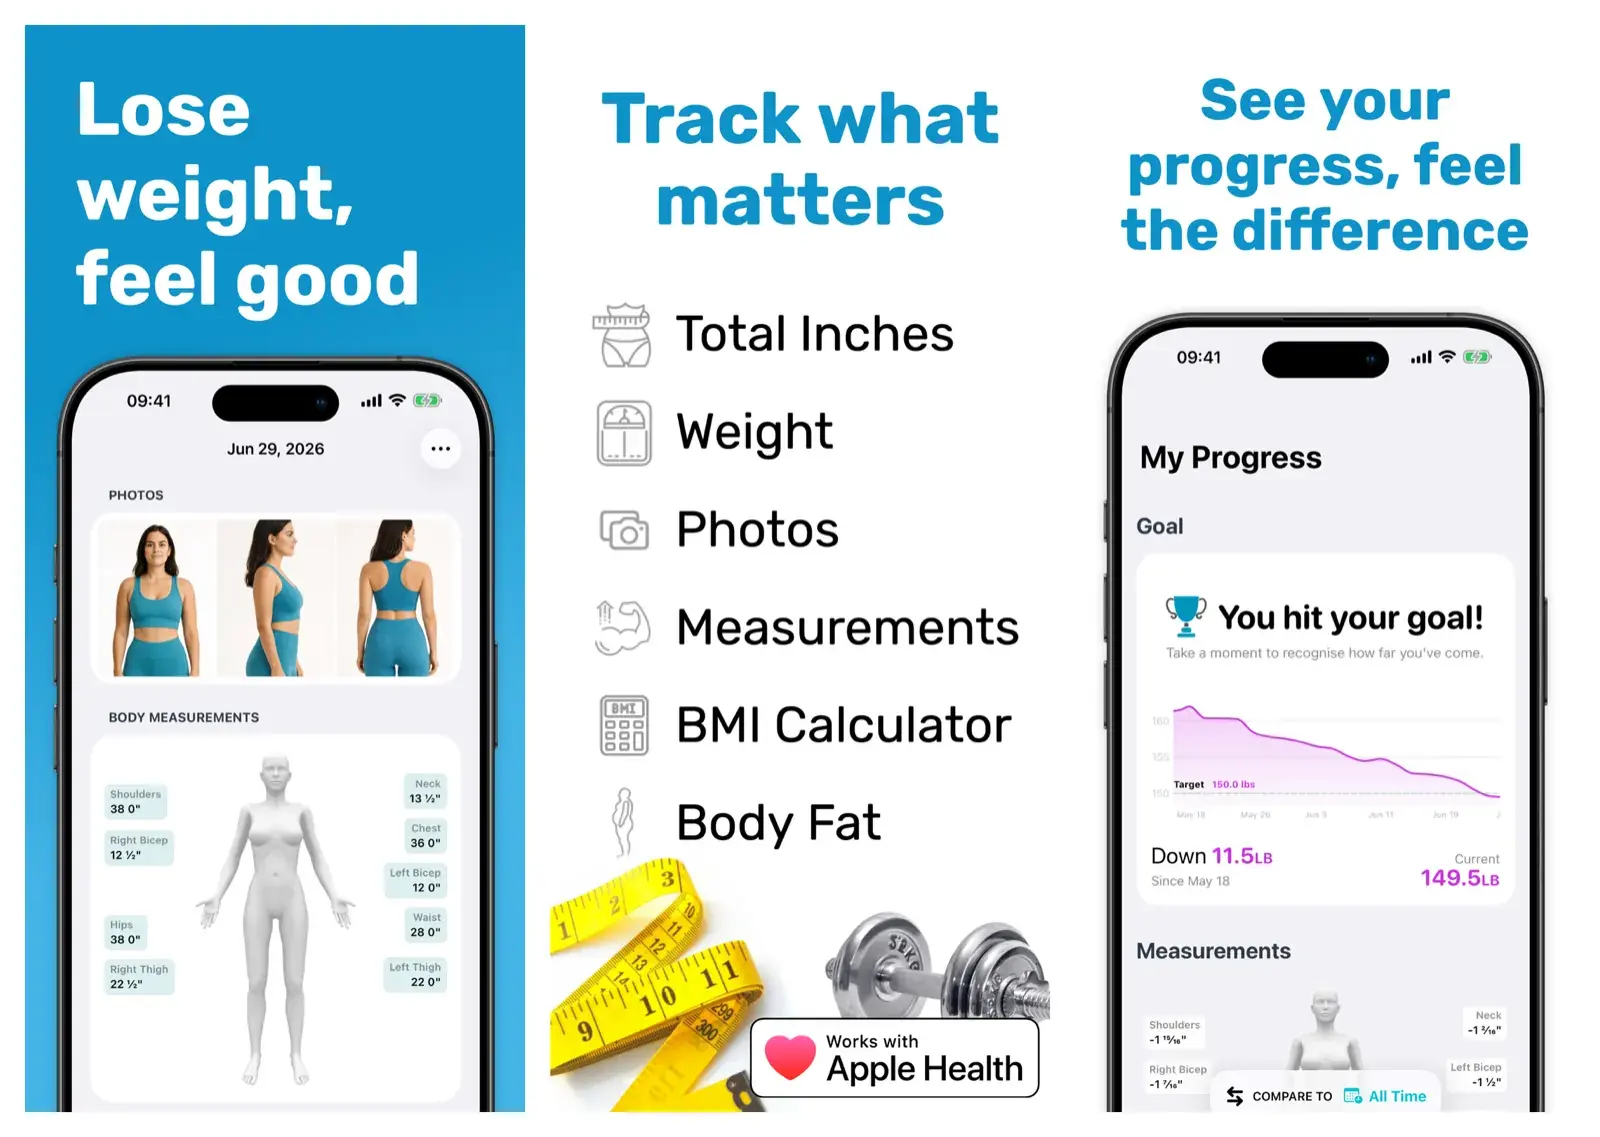
1. Progress: best for photos filed with your measurements
Platform: iOS App Store · Price: Free, with Pro from $3.99 a month or $29.99 lifetime
The visual diary. Progress is the long-standing pick for keeping photos next to your numbers: each entry attaches pictures to your weight, body fat, and tape measurements, so you scroll one timeline instead of three. Best if you already track measurements and want the photos filed with them.
2. Metamorph: best for perfectly aligned before and afters
Platform: iOS App Store · Price: Free, with Pro at $4.99 a month or $29.99 a year
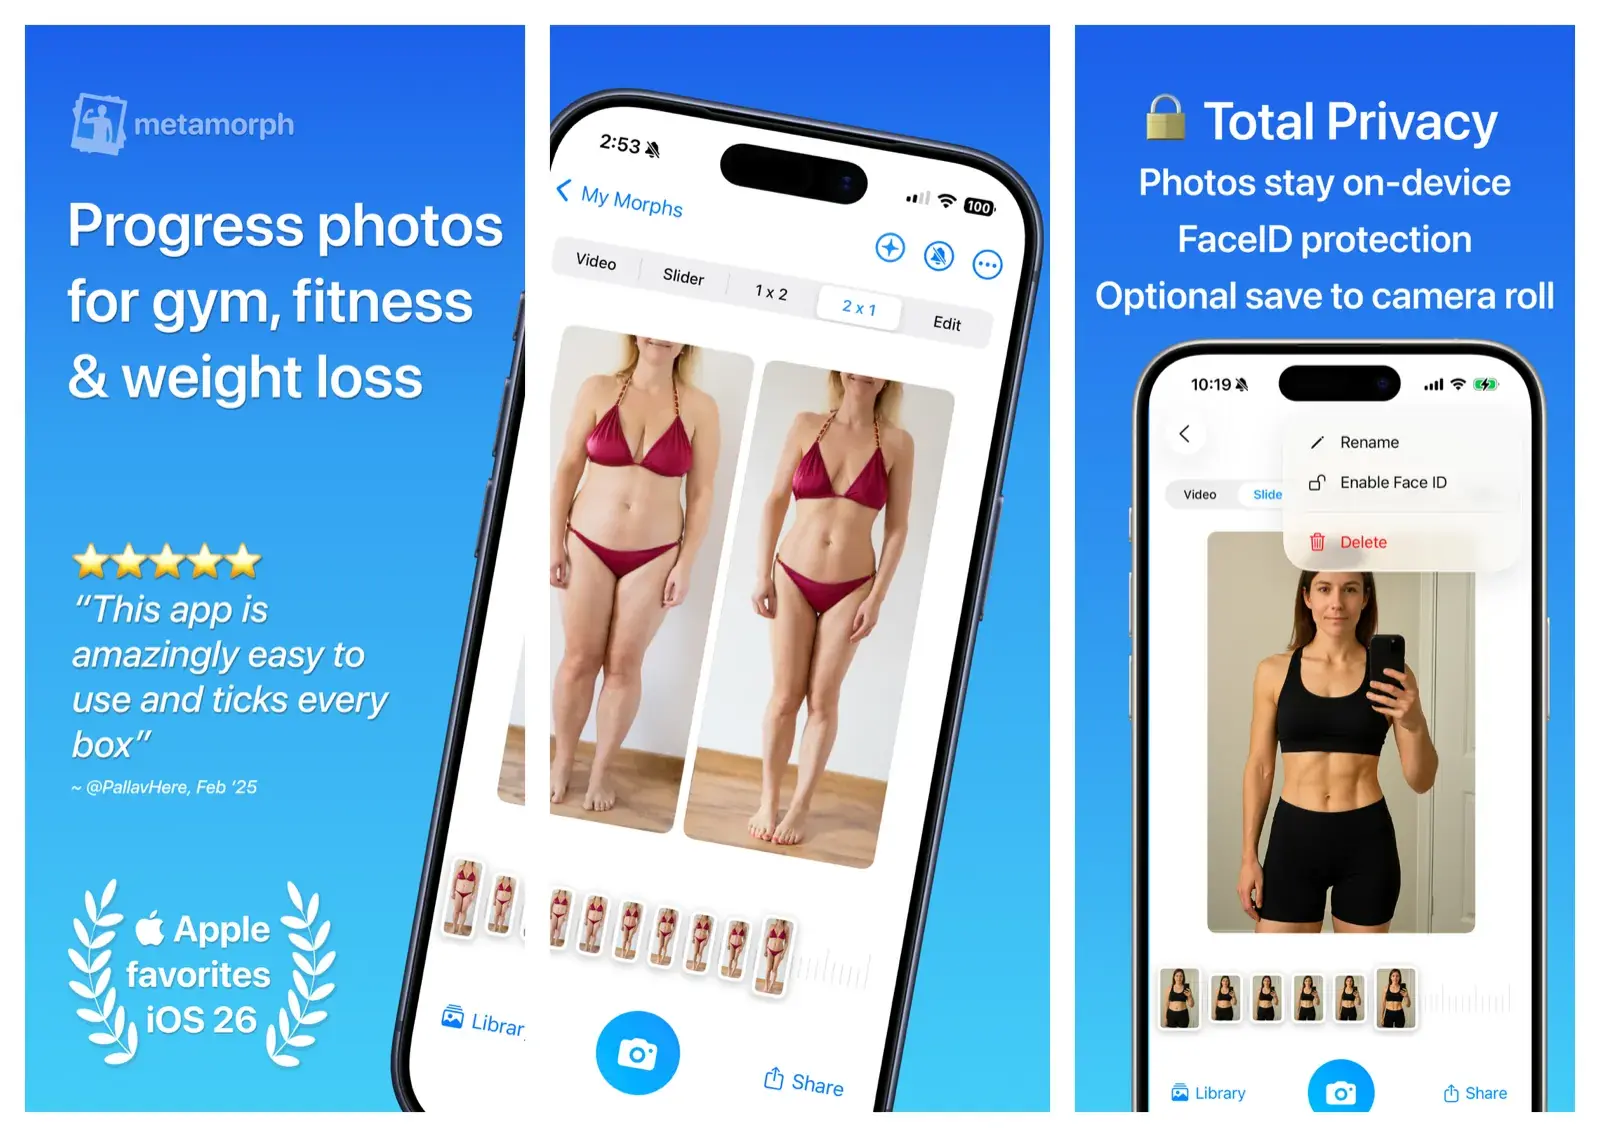
The alignment specialist. Metamorph shows a ghost of your previous photo on screen while you shoot, so every picture lines up with the last one. It then exports clean side by side images and time-lapse videos. Best if inconsistent framing is what ruined your comparisons before.
3. GainFrame: best for turning old gym selfies into a timeline
Platform: iOS App Store · Price: Free, with Pro at $5.99 a month or $39.99 a year
The one that rescues your old photos. If you have been lifting for a while, there are already progress photos sitting in your camera roll, just labeled "random gym selfies". GainFrame is an iOS app built around that idea: its import scans your camera roll, finds your physique photos, and sorts them by pose automatically, so months of old mirror selfies become a dated, comparable timeline the day you install it.
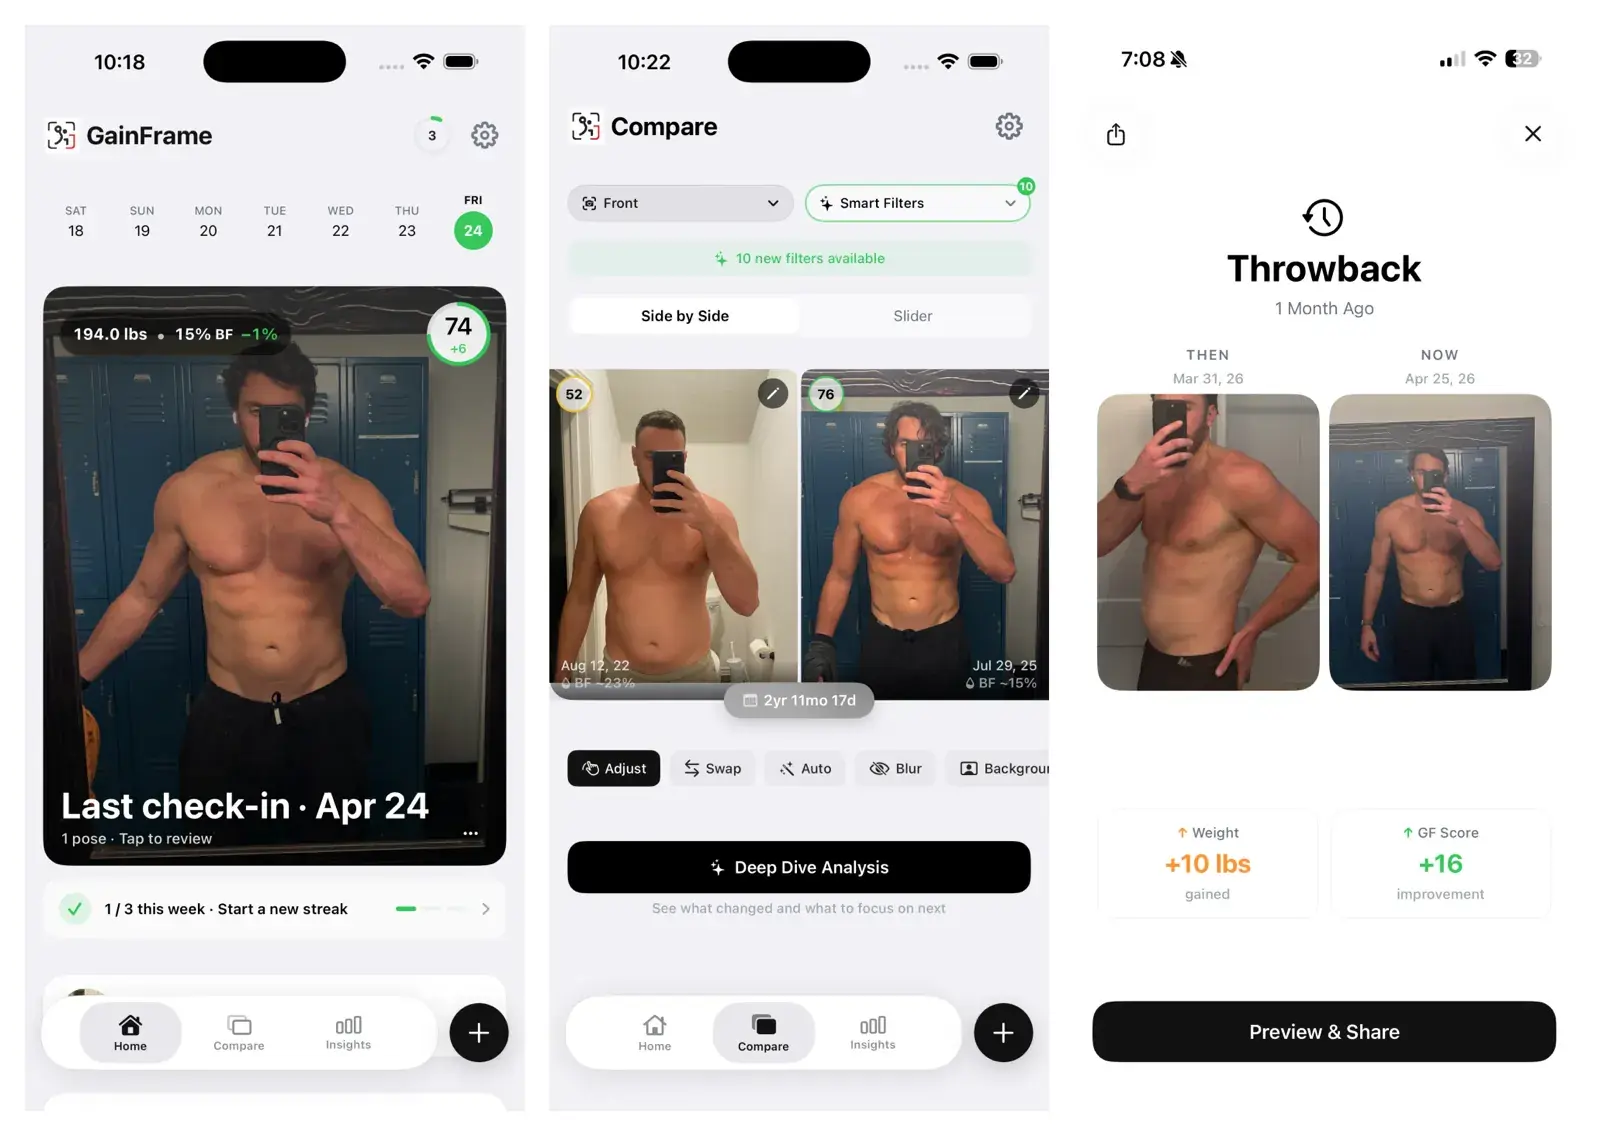
On top of each check-in it layers side by side and slider comparisons, automatic "throwbacks" against older photos, and an AI estimate of your body composition from each picture. Their guide on how to estimate body fat from a photo is a good read on which visual markers map to which body fat ranges. GainFrame says photos analyzed by the AI are never stored off your device.
4. PhotoJourney: best for guided framing
Platform: iOS App Store · Price: Free, with a Pro subscription from $3.99
The photo coach. PhotoJourney takes a ghost-overlay approach like Metamorph and adds camera guides for identical positioning shot to shot, with side by side and swipe comparisons for review. Best if you want the app to coach the photo-taking itself.
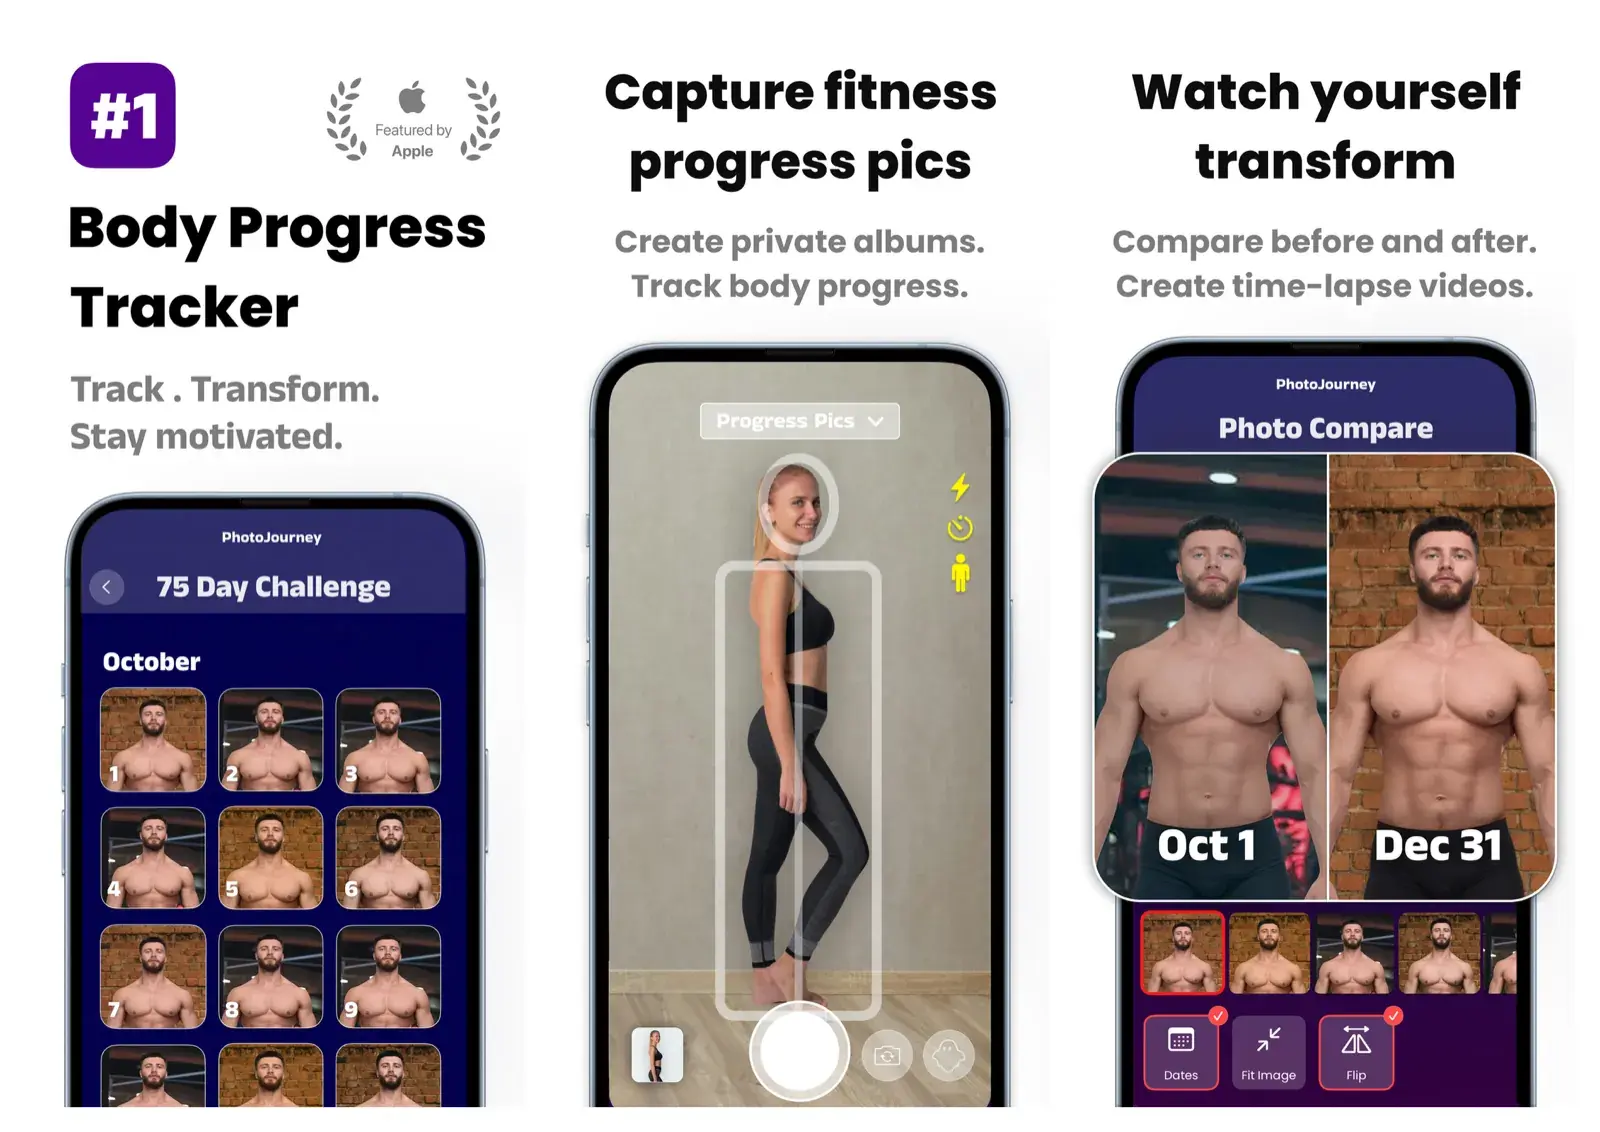
All four handle photos you take from today onward. If the backlog in your camera roll is the part you care about, GainFrame is the only one of the group that puts it to work.
How do the best progress picture apps compare?
| Feature | Progress | Metamorph | GainFrame | PhotoJourney |
|---|---|---|---|---|
| Standout feature | Photos filed with measurements | Ghost-overlay alignment | Imports and sorts old gym selfies | Guided framing |
| Old camera roll photos | Add manually | Add manually | Imported and sorted by pose | Add manually |
| Alignment help while shooting | Not advertised | Ghost overlay | Guided check-in poses | Ghost overlay plus camera guides |
| AI body composition estimate | No | No | Yes | No |
| Free tier | Yes | Yes | Yes | Yes |
| Pro price | From $3.99 a month, $29.99 lifetime | $4.99 a month, $29.99 a year | $5.99 a month, $39.99 a year | From $3.99 |
| Platform | iOS | iOS | iOS | iOS |
Prices and features shift over time, so check the current App Store listings before deciding.
Which progress picture app should you pick?
- Pick Progress if you want photos, weight, and tape measurements in one diary, and you care about the numbers as much as the pictures.
- Pick Metamorph if your past comparisons failed because nothing lined up, and you want clean side by side exports and time-lapse videos to show for your work.
- Pick GainFrame if you already have months of gym selfies in your camera roll and want them sorted into a timeline with body composition estimates on day one.
- Pick PhotoJourney if you want the camera itself to coach every shot, with ghost overlays and positioning guides doing the remembering for you.
Whichever you choose, the app is the easy part. The protocol above (same light, same clothes, same poses, every 2 to 4 weeks) is what makes any of them worth opening.
Keep the photos next to the numbers
Photos tell you what changed. Your log tells you why. A visible drop in body fat means little until you check whether your lifts held steady (fat loss) or dropped with it (muscle loss). That cross-check only works if both records are easy to read side by side.
If you log in a notebook or a notes app, keep doing that; it is the fastest method there is. The comparison problem is where the setups differ:
| Feature | Physical Notebook | Notes App | Traditional Gym App | Gym Note Plus |
|---|---|---|---|---|
| Logging speed | Fast | Fast | Slow (menus, taps) | Fast (plain text) |
| Data visualization | None | None | Charts | Charts from your notes |
| Flexibility | Total | Total | Rigid fields | Total |
| Searchability | None | Basic | Good | Full history search |
| Check a lift on any photo date | Page flipping | Scrolling | A few taps | One search |
Gym Note Plus keeps the plain-text logging you already do and turns it into structured history automatically. For photo day, that means:
- Instant answers to "what was I lifting then?" Search any exercise and see what you were doing the week of any photo.
- Volume and strength trends you can line up against your visual changes, no spreadsheet required.
- Your existing notes already work. Paste in months of old logs and they become charts, the same way GainFrame revives your old selfies.
A simple starting plan
- Take your first set today. Four shots, phone propped, timer on. Do not wait for better lighting or a better physique; today's photo is the baseline everything else compares against.
- Save the checklist. Paste the template above into your notes app and fill in your specifics once.
- Set a repeating reminder. Every 2 to 4 weeks, same day, same time. The reminder does the remembering so you only do the standing.
- Backfill your timeline. Let GainFrame pull the old gym selfies out of your camera roll and sort them, so your history starts months ago instead of today.
- Note the date in your log. One line ("progress photos taken") in your workout notes ties the visual record to the training that produced it.
A photo you took carelessly is a memory. A photo you take the same way every month is data.
Frequently Asked Questions
How do you take good gym progress photos?
Take gym progress photos in the same spot, same lighting, and same minimal clothing every 2 to 4 weeks, shooting front, side, and back from a fixed camera height. Photograph in the morning before eating so bloat and pump stay consistent, keep one relaxed and one flexed shot, and store them somewhere you can view them side by side to see real change.
How often should you take progress pictures?
Take progress pictures every 2 to 4 weeks. Body composition changes too slowly for daily or weekly photos to show anything except water, lighting, and pump differences. A 2-to-4 week cadence matches the pace of real muscle gain and fat loss, and keeping the interval consistent matters more than the exact number of days.
Should you flex or relax in progress photos?
Take relaxed photos first, because a relaxed pose is your true baseline and is hard to cheat. Add one flexed pose, such as a front double biceps, as a fourth shot to track muscle shape. Whatever mix you choose, repeat the exact same poses at the same effort level every session so photos stay comparable.
What is the best app for progress photos?
The best progress photo app depends on your starting point. Metamorph and PhotoJourney are strongest at keeping new photos aligned, Progress pairs pictures with weight and tape measurements, and GainFrame stands out if you already have gym selfies saved, since it sorts them into a timeline and adds AI body composition estimates.
Can an app organize the progress photos I already have?
Yes. GainFrame scans your existing camera roll, finds your physique photos, and sorts them by pose into a dated timeline automatically, so your photo history starts months back instead of at zero. Most other progress photo apps, including Metamorph and PhotoJourney, are built around photos you take from installation day onward.
How do you take progress pictures by yourself?
Prop your phone against a fixed object at roughly chest height, mark the spot on the floor with tape, and use the camera timer or a voice shortcut. A cheap tripod makes the back shot far easier. The mark on the floor matters more than the tripod, since camera distance is what breaks comparability.
How do you take weight loss progress photos?
Weight loss progress photos follow the same protocol as gym ones: same spot, same lighting, same minimal clothing, first thing in the morning before eating. Shoot front, side and back relaxed. The side angle usually shows fat loss first, and the 2 to 4 week interval matters more here because daily water shifts hide change.
Are progress photos more accurate than the scale?
For tracking visible body composition, yes. Scale weight swings daily with water, glycogen, and sodium, and body fat readings from impedance scales shift several percentage points from hydration alone. Standardized progress photos are immune to those swings, though they cannot measure visceral fat, so pairing photos with a weight trend gives the fullest picture.
Why don't my progress photos show any difference?
First check the interval: photos taken less than two weeks apart rarely show visible change, especially side by side. Then check consistency, since new lighting, clothing, or camera distance can hide real progress. If both are solid and months have passed with no change, the photos are doing their job by telling you to adjust training or nutrition.
Final Takeaways
- Standardize everything. Same spot, light, clothing, camera position, and morning timing. Consistency is what turns photos into measurements.
- Shoot four angles every 2 to 4 weeks. Front, side, and back relaxed, plus one repeatable flexed pose.
- Write the protocol down once. A checklist in your notes app removes every decision except pressing the shutter.
- Your camera roll already counts. GainFrame can sort the gym selfies you already have into a retroactive timeline, so you start with history instead of a blank slate.
- Pair photos with your log. Photos show the outcome, your training log shows the cause, and Gym Note Plus keeps the log readable enough to check either way.

Josh Ibbotson
Josh is the creator of Gym Note Plus, building tools that make workout tracking as simple as taking notes.
Ready to try it out?
Download Gym Note Plus and start tracking your workouts the way you want.
Download on App Store